Mastering the Turn: Your Guide to the Wing Foil Jibe
Blog post description.
BEGINNERS GUIDE'S
RM
7/16/20259 min read
So you've learned the basics of wing foiling – the exhilarating feeling of lifting off, gliding silently above the water, and harnessing the wind's power. You're cruising back and forth, enjoying the ride. But then you hit a common hurdle: changing direction smoothly while staying on foil. This, my friends, is where the wing foil jibe (often spelled gybe) comes into play.
The jibe is a fundamental maneuver that allows you to turn downwind, switch your stance, and continue riding in the opposite direction without dropping off the foil. It’s the key to continuous, flowing rides and unlocking your full potential on the water. While it might seem daunting at first, breaking it down into manageable steps and understanding the nuances will have you carving smooth, graceful turns in no time.
This guide will walk you through everything you need to know about mastering the wing foil jibe, from the foundational elements to common pitfalls and advanced tips. Get ready to turn with confidence!
Understanding the Wing Foil Jibe vs. the Tack
Before we dive into the steps, let's quickly clarify the difference between a jibe and a tack in wing foiling. Both are ways to change direction, but they involve different turning paths relative to the wind:
Jibe (or Gybe): This is a downwind turn where you steer the board away from the wind. You typically switch your stance and the wing’s position as you pass through the wind shadow. It's often considered the more fluid and graceful turn on a foil.
Tack: This is an upwind turn where you steer the board directly into and then through the wind. While possible on a foil, it's generally more challenging and less commonly executed than a jibe for recreational riding.
For continuous, flowing runs and maintaining momentum on foil, the wing foil jibe is the go-to maneuver.
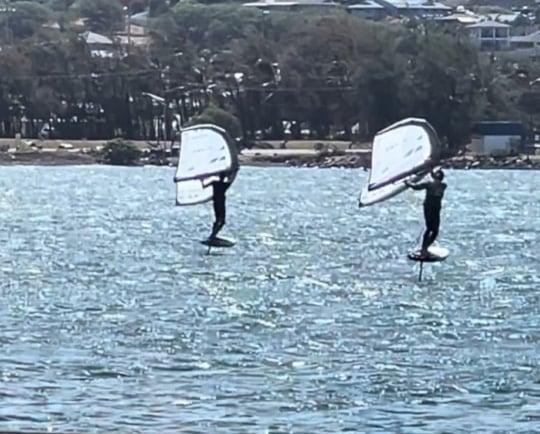
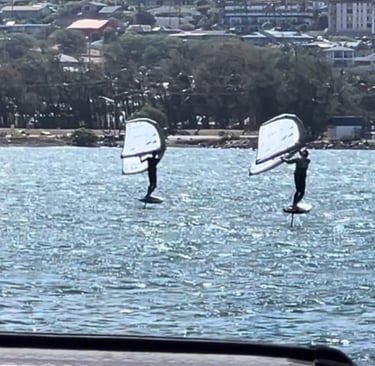
The Anatomy of a Perfect Jibe
The wing foil jibe can be broken down into several interconnected phases. Think of it as a dance where your board, foil, wing, and body all move in harmony.
Phase 1: The Approach – Setting Yourself Up for Success
This is perhaps the most crucial phase, as a good setup makes the rest of the jibe significantly easier.
Speed is Your Friend: You need sufficient speed to maintain lift through the turn. Don't attempt a jibe when barely on foil or struggling for power. Aim for a comfortable cruising speed, a little faster than minimum foiling speed.
Look Where You Want to Go: Your body naturally follows your gaze. Look around the turn, not at your feet. This helps initiate the carve and maintain balance.
Find Open Water: Ensure you have plenty of clear space downwind and to the side. The jibe takes up more lateral space than you might think, especially when learning.
Slightly Upwind Entry (Optional but Recommended): Some riders find it helpful to bear slightly upwind just before initiating the turn. This gives you a little more room to build speed as you turn downwind and creates a larger "window" for the carve.
Phase 2: The Carve – Leaning into the Turn
This is where the actual turn begins, initiated by leaning and steering.
Initiate the Turn with Your Hips and Ankles: Instead of just turning your shoulders, lead the turn with your lower body. Apply pressure to the heel side (or toe side, depending on your preferred turning direction) of the board. Your hips will follow.
Look Through the Turn: Keep your head up and eyes focused on where you want to exit the jibe.
Maintain Foil Height: As you lean into the turn, the foil's lift can increase. Counteract this by subtly shifting your weight slightly forward or easing off the back foot pressure. You want to maintain a consistent, manageable foil height, ideally mid-mast, neither breaching nor touching down.
Wing Position for Power: Keep the wing powered during the initial carve. You need the drive from the wing to maintain speed and lift through the turn. Don't let it flap or lose tension. Often, you'll sheet in a bit more to power the turn.
Phase 3: The Wing Flip – Seamless Transition
This is often the trickiest part, where you switch the wing from one side of your body to the other.
Timing is Everything: The wing flip typically happens around the deepest part of the turn, as you're heading directly downwind or slightly past it.
Lead Hand Release (for Switch): If you're planning a switch-stance jibe, the hand that was further forward on the wing boom/handle will release first.
Wing Over Your Head: As you release one hand, guide the wing over your head (or sometimes low and behind you, depending on conditions and preference). The goal is to get it to the new side of your body.
Grab with New Lead Hand: Quickly grab the wing with your new lead hand (which was your back hand). This hand will be closer to the leading edge of the wing.
Re-power: Once the wing is on the new side, immediately re-power it by grabbing with your new back hand and sheeting in to regain drive. This is crucial for maintaining speed and staying on foil.
Phase 4: The Stance Switch – Feet Work
As the wing flips, you'll need to re-adjust your feet for the new riding direction.
Momentary Shuffle: As the wing is mid-flip and momentarily de-powered or neutrally powered, you have a small window to shuffle your feet.
Back Foot Forward: Your previous back foot becomes your new front foot, stepping forward on the board.
Front Foot Back: Your previous front foot becomes your new back foot, sliding back to the appropriate position over the foil.
Balance and Commitment: This foot switch requires balance and commitment. Practice this on land first if possible, mimicking the wing flip.
Phase 5: The Exit – Riding Away Clean
You've made it through the hardest part! Now, consolidate your position and ride away.
Regain Full Power: With the wing flipped and your stance switched, fully power up the wing to regain speed and stabilize your ride.
Adjust Foil Height: You might have dropped a bit or risen too high during the turn. Make subtle adjustments to your foot pressure to return to your optimal foil height.
Look Downwind: Focus your gaze on your new direction of travel.
Enjoy the Flow: Ride away smoothly, ready for your next maneuver!
Common Pitfalls and How to Avoid Them
Learning the wing foil jibe is a journey of trial and error. Here are some common mistakes and how to fix them:
Losing Speed on Approach:
Fix: Ensure you're well-powered and cruising at a good speed before initiating the turn. Don't slow down as you start to carve.
Dropping Off Foil Mid-Turn:
Fix: Maintain a consistent, moderate foil height. Avoid extreme turns that cause the foil to breach or lose too much speed. Keep power in the wing through the turn. Shift weight slightly forward if the foil wants to shoot up.
Poor Wing Flip Timing/Execution:
Fix: Practice the wing flip on land or while standing on a board in shallow water without the foil. Get comfortable guiding the wing over your head and grabbing it with the new hands. The timing comes with repetition.
Struggling with the Stance Switch:
Fix: Practice foot shuffling on your board on land. Think of it as a quick, smooth shuffle rather than a full pivot. The moment the wing is neutral is your window.
Looking Down at Your Feet:
Fix: Keep your head up and look through the turn. Your body will naturally follow where your eyes are directed.
Not Leaning Enough/Over-Leaning:
Fix: Find the sweet spot for your lean. Too little, and the board won't carve. Too much, and you risk a rapid foil breach or touching down. Experiment with subtle adjustments.
Trying to Do Everything at Once:
Fix: Break the jibe down into its individual components. Master the carve, then the wing flip, then the foot switch, then combine them.
Drills to Accelerate Your Jibe Mastery
Consistent practice is key. These drills focus on isolated aspects of the wing foil jibe:
Carve Drills (On Foil): Practice long, drawn-out turns without attempting the wing flip or stance switch. Focus solely on maintaining foil height and speed while carving. Start with gentle curves and gradually make them tighter.
Wing Flip Drills (On Knees/Paddling): In light wind, get on your board (without the foil if necessary, or just paddling) and practice flipping the wing over your head from one side to the other. Focus on the hand movements and maintaining control of the wing.
Stance Switch Drills (On Land/Board): Stand on your board on land or in very shallow water. Practice quickly shuffling your feet to switch your stance as if you were in a jibe. Get the muscle memory down.
Practice on a Non-Foiling Board: Use a large SUP or a beginner wing foil board without the foil. Practice sailing and performing turns (tacks and jibes) on the surface. This builds confidence in your wing handling and board steering before the added complexity of the foil.
When to Attempt Your First Wing Foil Jibe
You should be comfortable with:
Consistently getting on foil.
Maintaining consistent foil height and speed.
Riding comfortably in both directions.
Controlling your wing in various wind strengths.
Ideally, start practicing in light to moderate, consistent wind (12-18 knots) and flat water. Gusty conditions or choppy water will add unnecessary difficulty. Choose a spot with plenty of open space downwind.
Progressive Learning Steps for the Wing Foil Jibe
Don't expect to nail it on your first try! Break it down:
Touch-and-Go Jibes: Start by attempting the carve and wing flip, but don't worry about staying on foil for the entire turn. Allow the board to touch the water briefly. The goal is to complete the turn and ride away on the surface, then get back on foil. This builds confidence.
Half-Jibes (Upwind Side): Focus on the initial carve. Turn a good 90-120 degrees downwind, but then head straight again without completing the switch. This hones your carving skill.
The Full Jibe: Once you're comfortable with the components, try to link them. Expect falls, but learn from each one. Were you too slow? Did you lose wing power? Did your feet get tangled?
Advanced Tips for a Silky Smooth Jibe
Once you're consistently nailing the basic jibe, here's how to refine it:
Look Far Ahead: Spot your exit point even earlier.
Minimal Wing Flap: Strive for a seamless wing flip with minimal flapping. This is achieved through precise timing and smooth hand movements.
Maintain Flow: The jibe should feel like a continuous, accelerating arc, not a series of distinct steps.
Low to Mid-Foil Height: Practicing at a lower foil height can make the jibe more stable as there's less height to manage.
Heel-to-Toe Transition: As you finish the turn, actively shift pressure from your heels to your toes to carve back upwind slightly for control.
Mastering the wing foil jibe is a huge milestone in your wing foiling journey. It transforms your riding from linear to fluid, opening up endless possibilities for exploration and creative expression on the water. Be patient, embrace the falls, and celebrate every small victory. Before you know it, you'll be carving effortlessly, gliding through turns with confidence and style.
FAQs about the Wing Foil Jibe
Here are some answers to common questions about the wing foil jibe, based on popular Google queries:
Q1: Is the wing foil jibe harder than the tack?
For most wing foil riders, especially on foil, the jibe is generally considered easier to master and more commonly used than the tack. The jibe keeps you traveling downwind, often maintaining more speed and lift through the turn. The tack requires passing directly into the wind, which can be more challenging to do smoothly while staying on foil.
Q2: What's the best wind speed to learn the jibe?
The ideal wind speed for learning the wing foil jibe is typically light to moderate, around 12-18 knots. This range provides enough power to stay on foil and complete the turn, but not so much that it's overwhelming or makes wing control difficult. Consistent, non-gusty wind is always preferred.
Q3: How many sessions does it take to learn the wing foil jibe?
This varies greatly depending on the individual, their prior watersports experience, and consistency of practice. Many riders can start consistently linking some form of jibe within 5-15 dedicated practice sessions after they're comfortable riding in a straight line. Achieving a truly smooth, committed jibe can take many more sessions and continued refinement.
Q4: Should I learn the switch stance jibe or stay regular?
While some riders initially learn a "front-side" or "back-side" jibe without fully switching their foot stance, the ultimate goal for versatility and comfort on both tacks is to master the full switch-stance jibe. Learning to switch your feet allows you to ride comfortably with either foot forward, which is essential for varied conditions and advanced maneuvers. Focus on the full switch from the beginning if possible, even if it's more challenging initially.
Q5: What's the biggest mistake people make when learning the jibe?
One of the biggest mistakes is losing too much speed on the approach or during the turn. Riders often slow down or let the wing depower, causing them to drop off foil. Another common error is not committing fully to the lean and turn, which results in an incomplete or stalled jibe. Looking down at your feet instead of through the turn is also a major culprit for losing balance.
Q6: Can I practice the jibe on a non-foiling board first?
Yes, absolutely! Practicing the jibe on a large SUP or a beginner wing foil board (without the foil attached) is an excellent way to get comfortable with the wing flip, stance switch, and board steering without the added complexity of managing the foil. This builds crucial muscle memory and confidence that directly translates to foiling.
Connect
Explore wing foiling schools, vendors, and events.
Support
Learn
801-554-1050
© 2025. All rights reserved.